Coordinate Systems

There are various convenient coordinate systems used to describe the orientation of the telescope and instruments with respect to the Roman observatory. This article provides a high-level overview of the coordinate systems that may be helpful to users when planning or analyzing their data.
This article is organized in a top-down approach, starting from the observatory level down to the detector level. This allows readers to understand the orientation of the detector in relation to the overall observatory frame. Moreover, the reference frames discussed are implemented in the Roman Science Instrument Aperture File (SIAF), and tools such as PySIAF can be used to convert between different frames. The PySIAF for Roman article in the Simulation Tools Handbook provides an overview of these tools.
Observatory & Telescope Coordinate Systems
The Roman telescope V frame is useful for specifying angular positions over the field of view of the telescope. For consistency, it is defined similarly to the HST and JWST ones, such that the origin of the Roman telescope V frame is located at the vertex of the primary mirror, and the +V1 axis is aligned with the boresight of telescope. The +V3 is defined as normal to center of the Solar Array Sun Shield, and the +V2 axis completes the right-hand system. In the SIAF, positions in the V frame are given in units of arcseconds. For reference, the telescope V frame is shown in Figure of Observatory Reference Frames, along with the Observatory reference frame.
Figure of Observatory Reference Frames
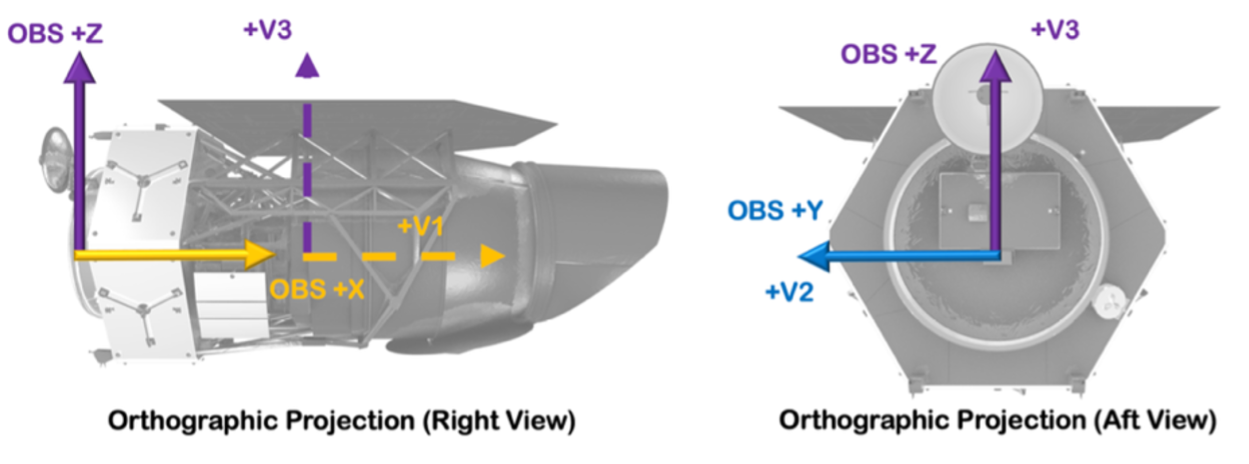
Visual representation of the V frame reference system overlaid on projections of the Roman spacecraft. The V frame is shown with the dashed lines, where the +V1 axis is normal to the primary mirror, the +V3 axis is normal to the Solar Array Sun Shield, and the +V2 axis completes the right-handed coordinate system. Also shown with solid lines is the Observatory Body System (OBS) reference frame, the origin of which lies 4.4 meters behind the vertex of the primary mirror, at the center of the Observatory-to-Launch Vehicle separation plane. In the aft view (left panel), the OBS and V frames overlap.
WFI Coordinate Frame
The Figure of the Roman Field-of-View shows how the focal plane array (FPA) relates to the telescope V frame. The WFI FPA is rotated by 60 degrees from the -V3 axis and its center is offset by 0.496 degrees from the origin of the V frame, as shown by the circle-cross symbol between WFI01 and WFI10. The +V2 and +V3 axes point to the left and up, respectively. Also shown in the Figure of the Roman Field-of-View is the small footprint of the Coronagraph. Note that the Figure of the Roman Field-of-View is a sky projection, i.e., it is shown looking from the primary mirror out to the sky.
Figure of the Roman Field of View
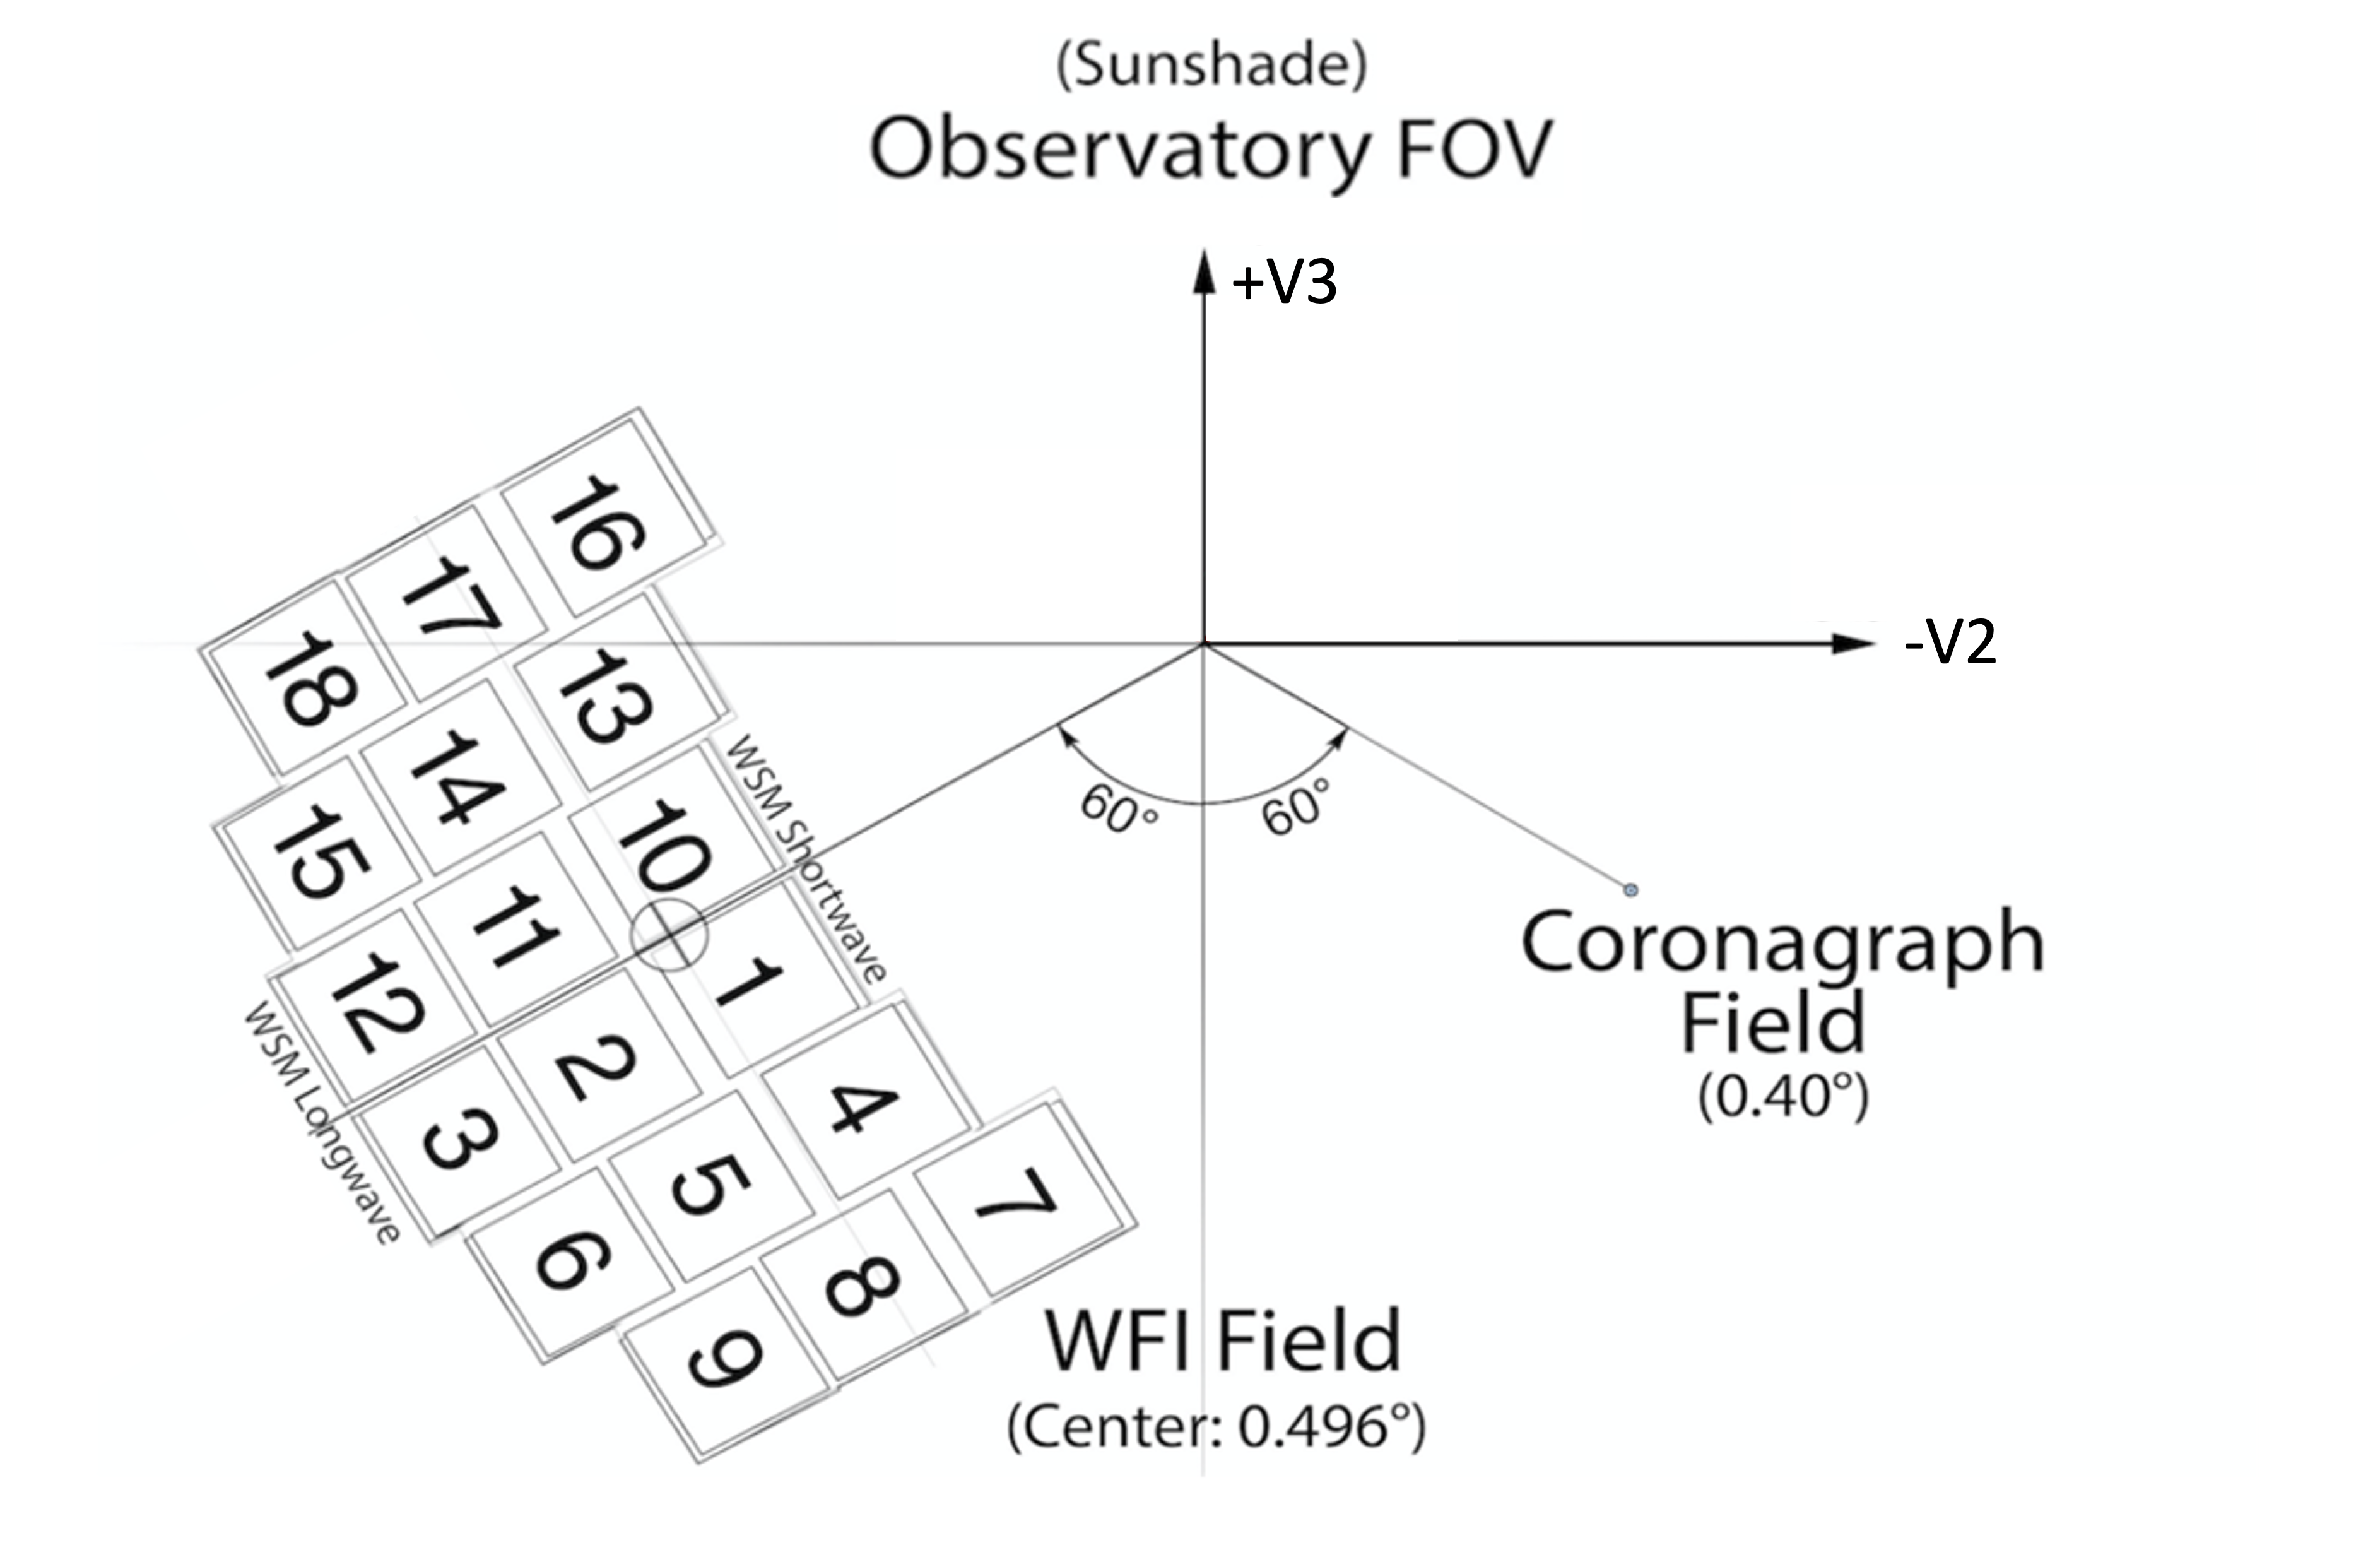
Illustration showing the relative positions of the WFI and the Coronagraph in the telescope V frame. The numbers on the WFI detectors indicate their labeling within the focal plane (e.g., WFI01). The V1 axis, at the origin of the V frame and pointing into the page in the figure above, is also referred to as the telescope boresight. Note also that the axes are labeled for +V3 and -V2.
Detector & Science Frames
Each of the 18 WFI detectors has its own local coordinate system, defined by the orientation of its readout electronics. In particular, the electronic amplifiers correspond to fast and slow pixel readout directions, which define the x and y axes of the detector coordinate system, respectively. The origin of the detector frame is located at the corner of the Sensor Chip Assembly (SCA) adjacent to both the fast and slow scanner electronics. Figure of Detector Readout is the schematic of a detector layout and readout directions; more information can be found in the Description of WFI article in the The Wide Field Instrument.
Figure of Detector Readout
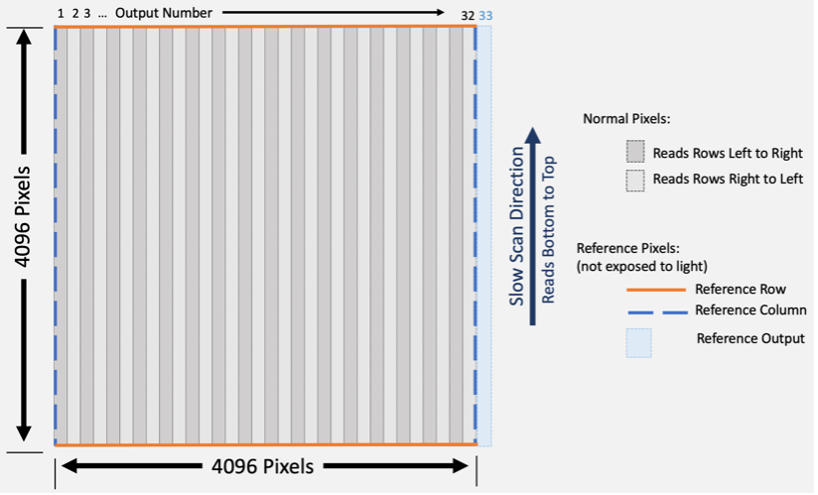
This schematic explains some of the read out operations of the WFI H4RG-10 detectors. The detector is 4096 pixels by 4096 pixels on each side. The columns are divided into 32 "outputs" that are 128 pixels wide and read out by a different amplifier; these are represented by the grey (odd outputs) and light grey (even output) bands in the schematic. The output identifications are given at the top of the figure (from left to right, 1 to 32). The slow scan direction is from bottom to top. The fast scan directions are left to right in grey (odd output) bands and from right to left in the light gray (even output) bands. On each edge of the detector, a region of 4 pixels wide makes a pair of reference rows (shown as solid orange lines in the schematic) and of reference columns (shown as dashed blue lines in the schematic) that serve as on-chip physical reference pixels. A 33rd output, shown in light blue in the schematic, is a virtual reference output.
Because of the way the electronic components are integrated into each of the WFI detectors, the arrangement of the overall focal plane array is such that the detector reference frames are not all aligned with each other, as shown in the Figure of WFI Field of View and Reference Frames. The WFI science frame aims to uniformly orient each of the detectors by flipping the images such that (1) the y-axis is fixed to the left edge of the detector, (2) the x-axis is fixed to the bottom edge of the SCA, and (3) the origin of the science frame is located at the bottom-left corner of each detector (see the Figure of WFI Field of View and Reference Frames). For any of the detectors, one science axis will be parallel to its corresponding detector axis, while the other axes are anti-parallel. As a result, either a vertical or horizontal flip will be necessarily to transform each detector reference frame into the corresponding science one. In the SIAF, positions in both the detector and science frames are given in units of pixels.
The user should note that Level 1 and Level 2 products from the Roman WFI Data Pipelines will be archived in the science frame.
Figure of WFI Field of View and Reference Frames
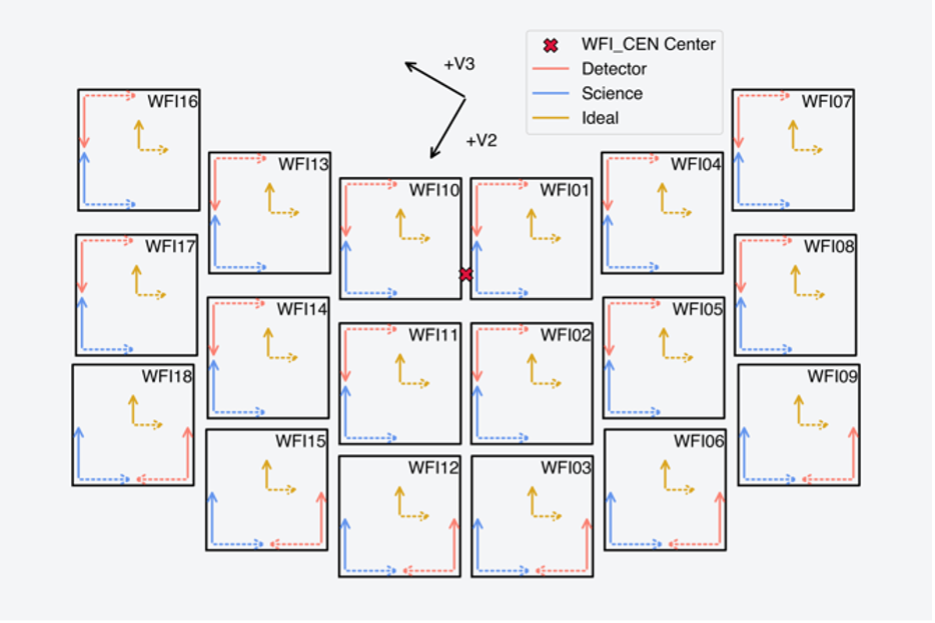
WFI detector and science coordinate systems projected on the sky. Solid lines on each detector indicate the y-axis, while dashed lines indicate the x-axis. Blue lines denote the science frame, red lines the detector frame, and yellow lines the Ideal frame. The V-frame axes are shown for reference only and do not represent their true origin. The WFI_CEN reference position is marked by a red “×”; its associated Ideal coordinate axes are oriented identically to those of the individual detectors and are centered on this position.
For completeness, Figure of WFI Field of View and Reference Frames also shows the detector Ideal frame, which is a distortion-removed frame centered on each detector. Coordinates in the Ideal frame can be regarded as a location in a tangent plane projection over the scale of a detector, whose origin is at the detector fiducial point (generally its center). The conversion from pixels to telescope (and then sky) angular positions is done using a 2-D polynomial that is a function of science pixel positions. In the SIAF, positions in the Ideal frames are given in units of arcseconds.
Note
Level 1 data products contain the reference pixels (i.e., the arrays are N x 4096 x 4096, where N is the number of resultants), while Level 2 files remove the reference borders (i.e., the arrays are 4088 x 4088). Both products use the science frame orientation, but there is a 4-pixel shift of the origin in both X and Y between Level 1 and 2 products. Note that the 33rd amplifier pixels are stored in a separate array in science frame orientation.
Considerations for Observation Planning
In the context of observation planning, several of the reference frames introduced above are used to specify the orientation of the WFI footprint on the sky. Central to this is the concept of position angle, defined here as the angle between a given axis and celestial North, measured counterclockwise. Two axes are commonly used when specifying position angle: (1) the aperture Y-ideal axis and (2) the telescope V3 axis measured at the aperture reference point. For the WFI_CEN aperture, the relative orientation offset between the telescope V3 and the Y-ideal axis is -60°:
| APA = V3PA - 60^\circ |
APA and V3PA are described below. Difference between the Aperture Position Angle (APA) and the V3 Position Angle (V3PA).
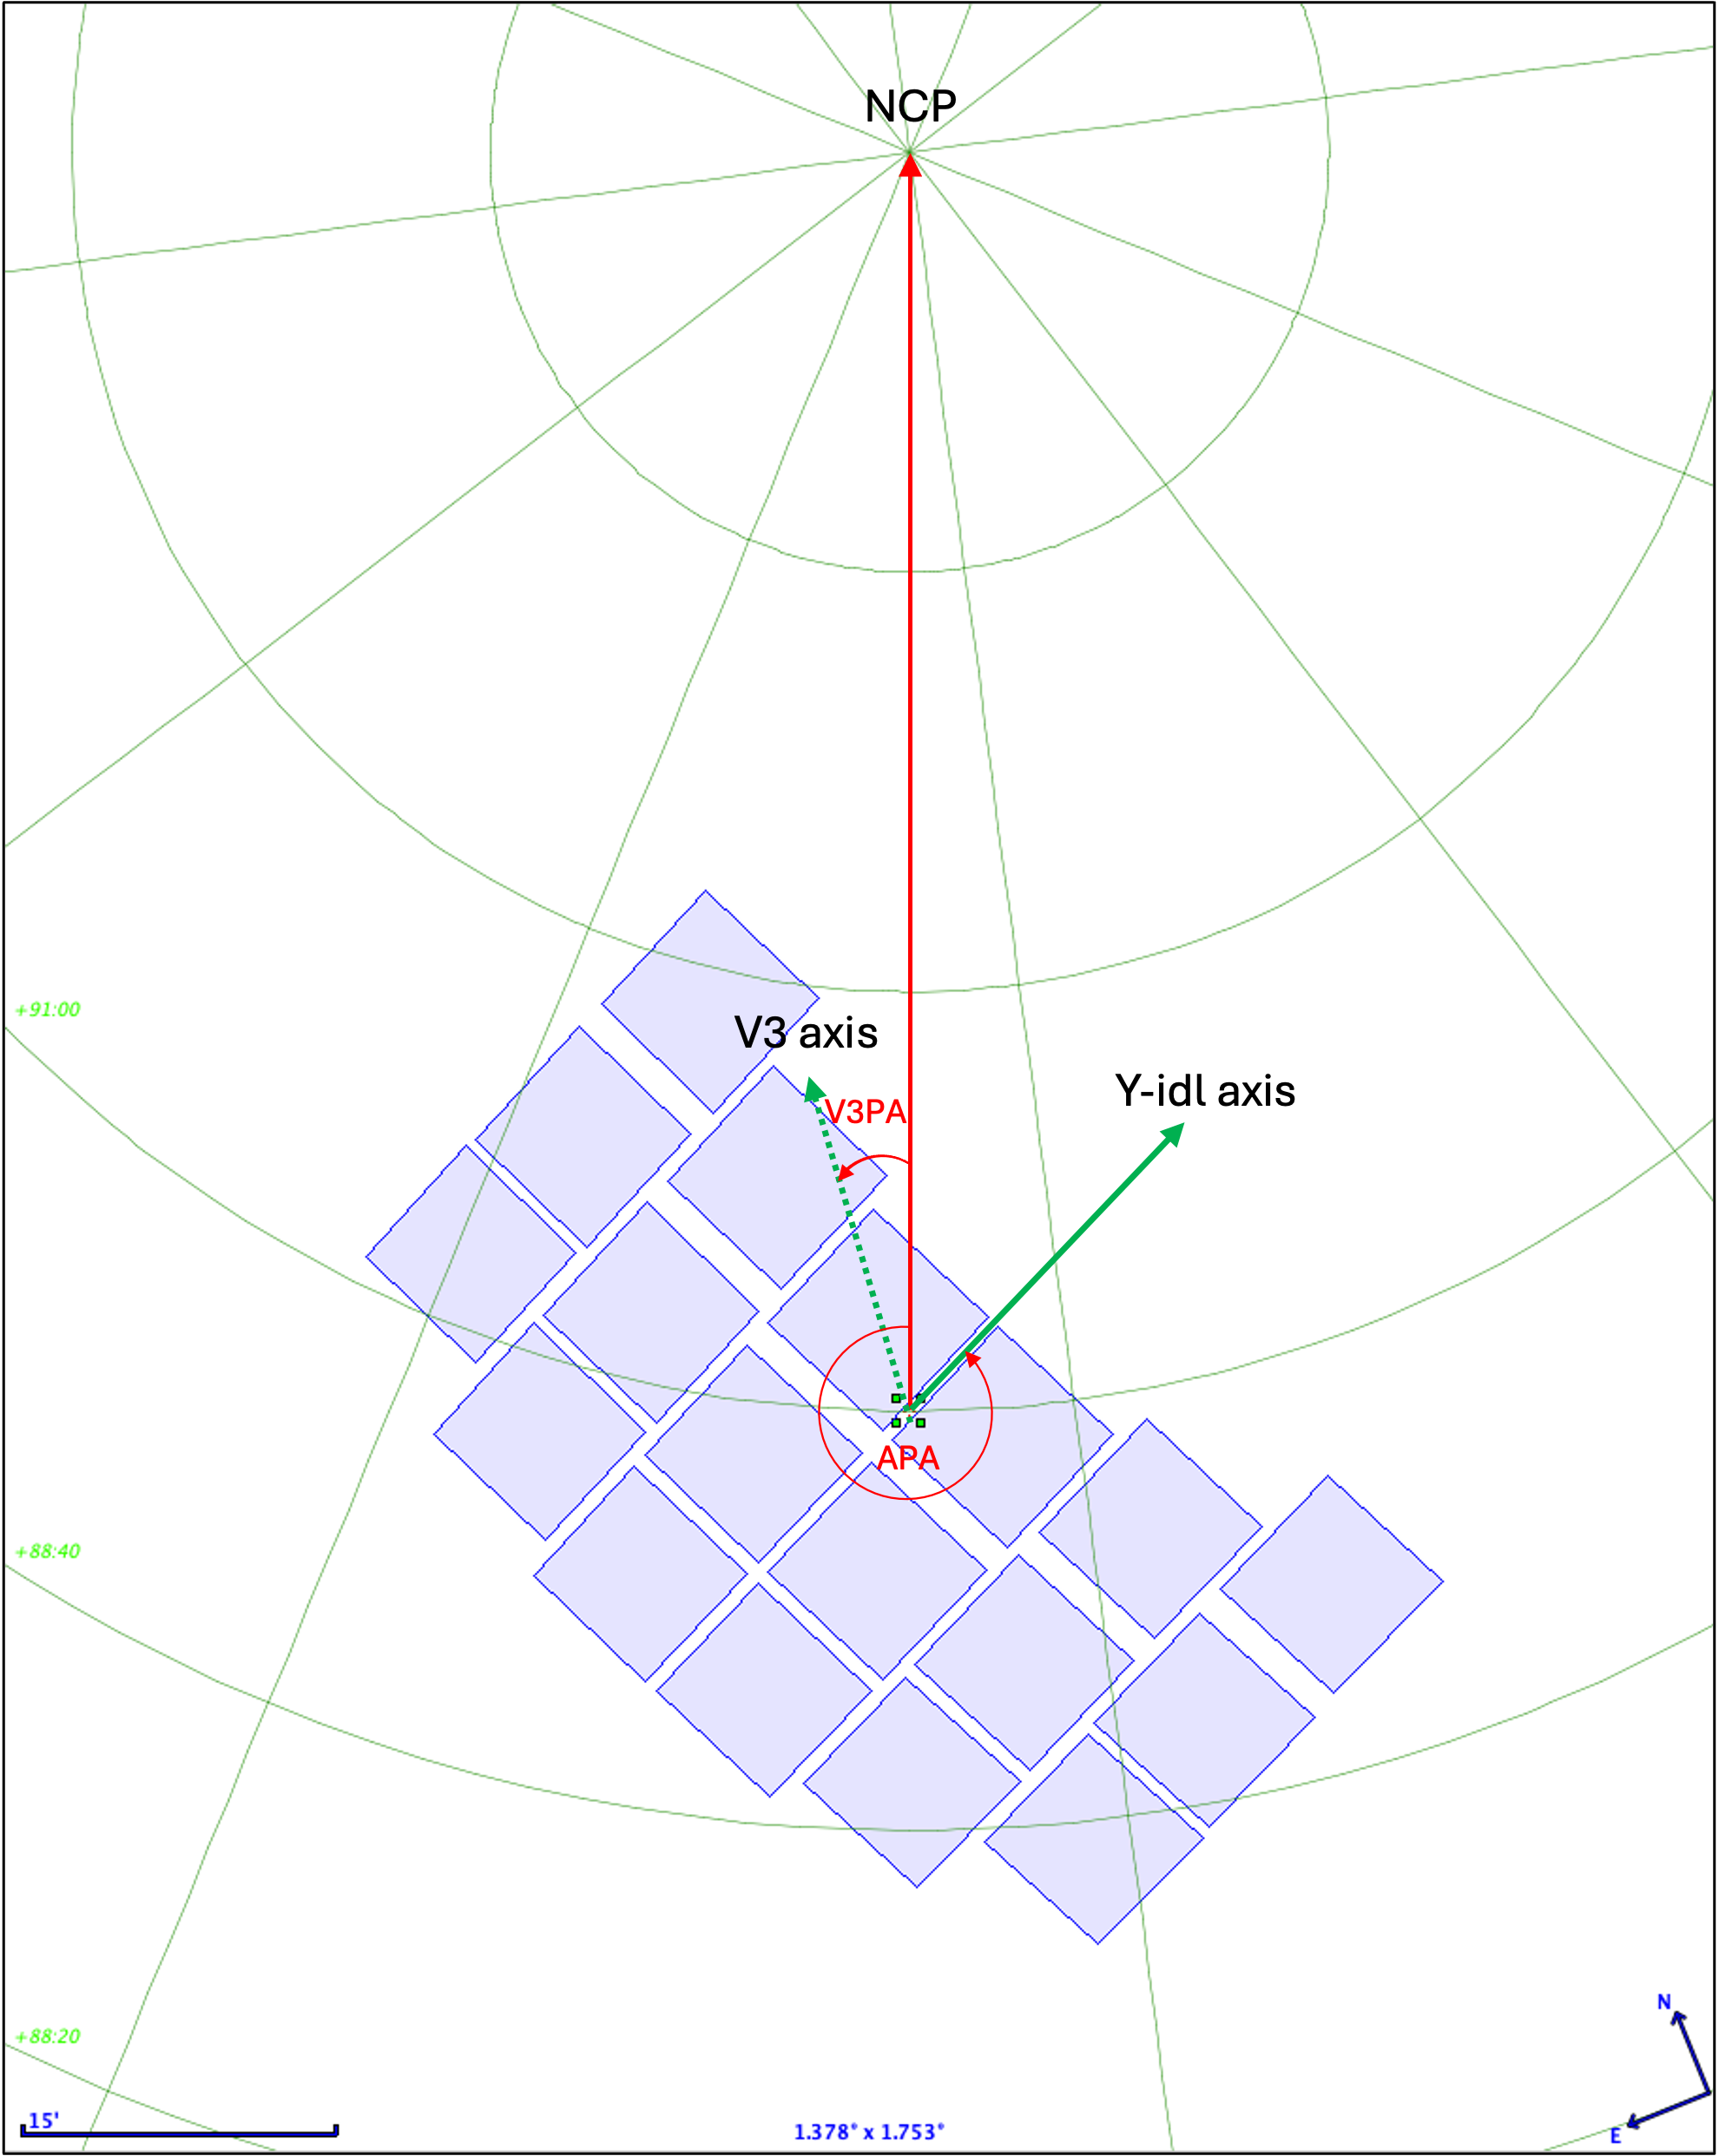
This figure illustrates the main axes and angles used for observation planning. The WFI_CEN aperture is shown in blue, with the North Celestial Pole (NCP) at the top. The Aperture Position Angle (APA) is measured counterclockwise between the vector pointing to the NCP and the WFI_CEN aperture Y ideal axis, while the V3 position angle (V3PA) is measured between the NCP and the V3 axis at the aperture reference point. Note that the WFI_CEN Y ideal axis is rotated by -60º with respect to the V3 axis.
Aperture Position Angle (APA)
The Aperture Position Angle (APA) is the angle between North and the aperture’s Ideal Y axis. In most Roman applications, the relevant aperture is WFI_CEN, as shown in the WFI footprint figure above, where the Y-ideal axis is labeled. The APA directly describes how the WFI footprint is oriented on the sky and is therefore the most relevant quantity for users who require a specific on-sky orientation.
V3 Position Angle (V3PA)
The V3 Position Angle (V3PA) is the angle between North and the telescope V3 axis at the aperture reference position. For WFI_CEN, this axis is also illustrated in the WFI footprint figure above.
Users should be aware of the distinction between these angles and how they are presented in APT and other planning tools. For example, both the Aladin display element in APT and the diagnostics reported by the APT Visit Planner reference the V3PA. In most locations within the APT GUI, both the APA and V3PA are displayed for convenience.
While most observers will focus on the APA when planning observations, APT interfaces directly with the scheduling system and therefore operates in the observatory coordinate system, using V3PA internally and converting to APA as needed.
For additional questions not answered in this article, please contact the Roman Help Desk.
References
- Cox, C. and Lallo, M. 2017 "Description and Use of the JWST Science Aperture File", STScI Technical report JWST-STScI-001550
- Roman Space Telescope Technical Information Repo, jointly maintained by the Roman Project Science Office, Science Operations Center, and Science Support Center